Friday, September 28, 2018

Google Chrome Tips and Tricks

Google Chrome Tips and Tricks


Google Chrome is my browser of choice. This is mainly due to the fact that we utilize G Suite apps in my district so using Chrome works nicely with those integrations. After using Chrome for a while, I have learned some tips and tricks. I am here to share those with you. I find these useful for my everyday use and productivity. 

Removing Bookmark Names

One thing I like to do is just have a website's icon on my bookmark bar. This allows me to have more visible bookmarks. To do this, all you have to do is right-click on a bookmark, choose edit. From there, delete the name of the bookmark. Afterward, click save. Now, you will just have the website icon.


Pulling Tab Out to Create New Window

Another trick I like to use in Chrome is pulling a tab out to create a new window. This is especially useful when you re using a dual monitor setup. You can easily pull a tab out and drag it over to the other monitor. To do so, all you have to do is click an hold on a tab. While still holding down, drag the tab out to create a new window.


Resizing Omnibox

Another trick I like to use in Chrome is resizing the Omnibox. This is especially useful when you have two windows side-by-side and cannot see the entire URL of a website. To resize the Omnibox, simply move your mouse up to the right side of the Omnibox until you see your mouse change from an arrow to a line with arrows on each end. From there you can simply drag the Omnibox to the right and left to resize it.


Open Chrome to Particular Page(s) on Startup

You can have Chrome open to a particular page(s) when opening Chrome. To do so, simply head on up to the vertical ellipsis (three dots stacked on top of each other) and go to settings. From there, head down to On Startup. From there, you can choose to Open a specific page or sets of pages. You can then add the URLs of whatever page or pages you would like Chrome to open on startup. Personally, I have Chrome open Google Keep and My Drive due to the fact that these are the two programs I tend to use the most throughout the day.


Add Extensions

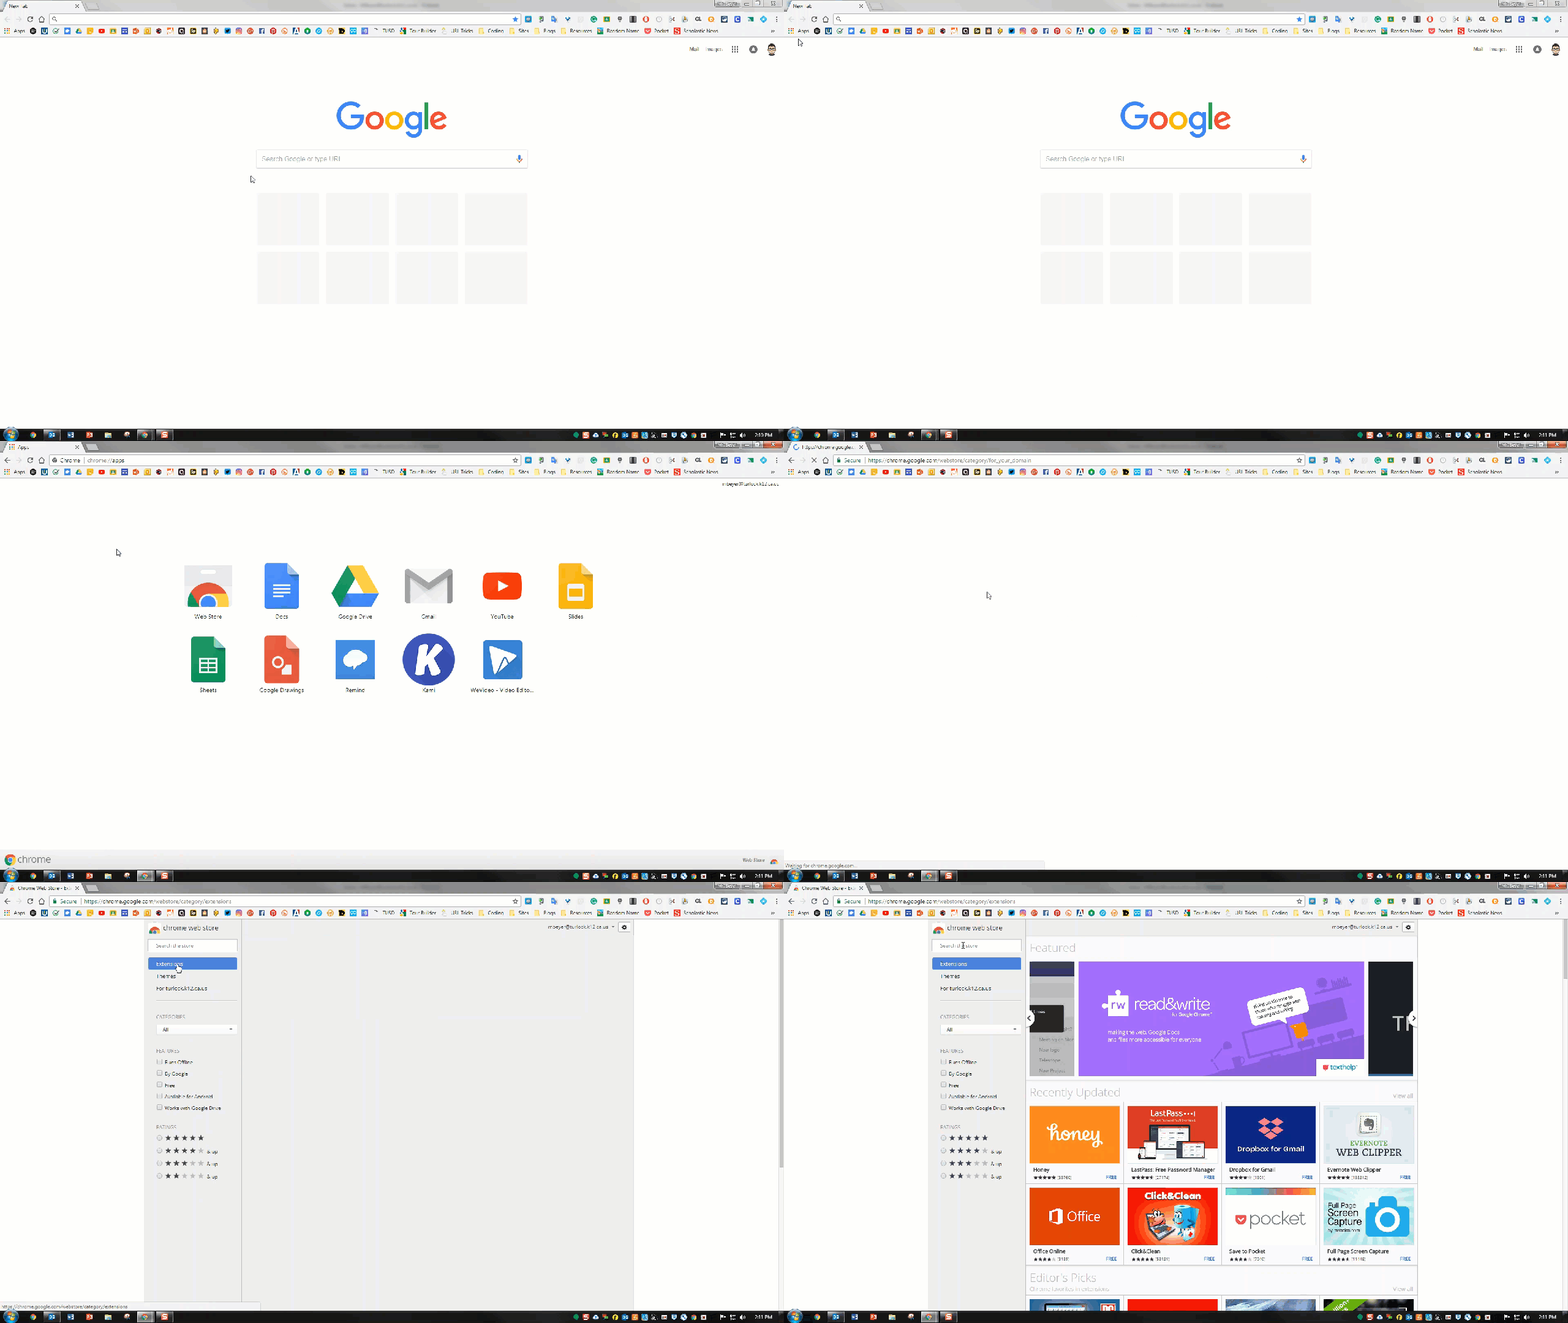
Extensions are great tools to help enhance your Google Chrome experience. To add an extension to Chrome, head on over to the Chrome Web Store. Once you are in the Web Store, click on Extensions. There you can search for the extension you are looking for and add it to Chrome. Check out our blog post on Useful Google Chrome Extensions to find some useful extensions I use.


Do you have any tips or tricks you use in Chrome not mentioned here? Share them in the comments sections!

Monday, May 7, 2018

Super Useful Keyboard Shortcuts

Super Useful Keyboard Shortcuts

A keyboard is something that we interact with daily, sometimes multiple times a day. The programs that we use have certain functions in them. Did you know that there are keyboard shortcuts that allow you to access those functions quickly? Let's go over some of the keyboard shortcuts I find most useful and ones that I use daily. These keyboard shortcuts are ones that I use while surfing the web with Google Chrome and using a Windows device and a Chromebook.

Cut (Ctrl + X)

Using this keyboard shortcut allows you to cut either text, an object, or an image out of a document. It is now placed on your clipboard. You can now paste the text, object, or image into another place on the document.

Copy (Ctrl + C)

This keyboard shortcut allows you to copy text, an object, or an image in your document. The text, object, or image is now placed on your clipboard. You can now paste the text, object, or image into another place on your document.

Paste (Ctrl + V)

After you have either cut or copied a piece of text, an object, or an image it is placed on your clipboard. To paste what you have placed on your clipboard, simply use the keyboard shortcut Ctrl + V.

Undo (Ctrl + Z)

If you are wanting to undo a change you have made on a document, simply use the keyboard shortcut Ctrl + Z.


Select All (Ctrl + A)

To select everything in a document, simply use the keyboard shortcut Ctrl + A.


Lock Screen (Search + L)

If you want to lock your screen, simply click on the spotlight + L (Chromebook) or Windows key + L (Windows). That way, to get back into your computer, you would have to input your password.


Interest a Link (Ctrl + K)

To quickly insert a hyperlink, simply highlight some text, an object, or an image and then use the insert link keyboard shortcut Ctrl + K. This will bring up the options to insert a link to then make the highlighted text, object, or image a hyperlink.

New Window (Ctrl + N)

When using Google Chrome, to open a new window, simply use the new window keyboard shortcut Ctrl + N.


New Tab (Ctrl + T)

To quickly create a new tab in Chrome, simply use the new tab keyboard shortcut Ctrl + T.


Chrome Menu Window (Alt + F)

To quickly bring up Chrome's menu window, simply use the keyboard shortcut Alt + F.


Move Object to the Top (Ctrl + Shift + Up Arrow)

When working in Google Slides or Google Drawing, when you are layering objects or images on top of each other, to quickly move one to the top simply use the Ctrl + Shift + Up Arrow.


Screenshot on Chromebook

If you are wanting to take a screenshot when using a Chromebook, simply click the spotlight key (the one with the magnifying glass) + all windows key. This will take a screenshot fo your entire screen. You Could also use Ctrl + F5.

If you are wanting to take a partial screenshot, simply click the spotlight + Shift + all windows. You could also use Ctrl + Shift + F5. You will then see that your mouse arrow will now turn into a plus. you can now click and drag over the area of the screen you wish to take a screenshot of. 


Any keyboard shortcuts you use that were not mentioned here? Please share them in the comments!

Super Useful Chrome Extensions


If you are not familiar with extensions, they are these great applications that you can add to your Google Chrome browser. Extensions allow you to add some extra functionality to your Chrome browser. If you were head over to the Chrome Web Store, you will find a plethora of extensions and could easily get overwhelmed. I am going to share some of my favorite extensions and how I use them.

This extension is a good one for those people who are new to G Suite. With the G Suite Training extension, you have access to simple interactive lessons specific to the Google app you are using. For example, if I am using Google Docs, I can access the G Suite training extension to find lessons specific to Google Docs. You will see the G Suite Training icon in the top right-hand corner of your window. Simply click on it to access the lesson.

 The Google Keep extension allows you to save things you find while surfing Chrome to Google Keep. Whether it be a website, image, or quote all you have to do is, while on the site, simply click the Google Keep extension icon and it will save it to your Kepp notepad. You can add a title and some notes straight from the extension.

Grammarly is a great extension if you want to ensure that your spelling and, you guessed it, grammar are firing on all cylinders. Grammarly makes sure that what you are typing, whether it be on Gmail, social media, or nearly anywhere you write on the web is mistake free. If you register, you will also receive weekly email updates with your performance stats.

Screencastify is a screen recording extension. With Screencastify, you are able to annotate your screen with a pen tool and have a focused spotlight on your mouse. With the premium version, you can crop and trim your recordings. All recordings save directly to your Drive. This is a great tool to use if you are wanting to create demonstration videos for students.

If you have at least two tabs open, Tab Scissors extension will split it into two smaller side-by-side windows. All of the tabs that are open to the left of the selected tab will stay to the left, and the rest of the tabs will stay to the right. The Tab Glue extension brings all of the Chrome tab windows back together into one window.

Google Cast for Education allows you to turn your computer into a wireless projector. Google Cast allows you to share your screen from another device to the device connected to the projector. This is a great tool if you are wanting to quickly share something on a student's device with the class. 

Turn Off the Lights
Turn Off the Lights is a great extension to use in the classroom if you are watching a video on YouTube. With just a single click of the extension, your page will fade to black only showing the video you are wanting to share with your class. By clicking on the extension again, your page will return to normal.

AdBlock
AdBlock is a good extension to have to be able to block ads on YouTube, Facebook and ads everywhere else on the web. On the AdBlock extension, you will see the number of ads that have been blocked on the particular site you are visiting.

Just Read
Just Read is a nice extension to remove distractions from a web page. With just one simple click of the extension, you can quickly remove ads, the pages style, popups, and comments. All you are left with is just the text and images relevant to the article you are reading. With another click of the extension will take you back to the original format of the web page.

OneTab
OneTab is a quick and easy way to convert many tabs into a list. When you need to access those tabs again, you can restore them individually or all at once. Another way this extension can be put to good use is compiling website you want to share with students. You can have the websites you want to share with students open on each tab, activate the OneTab extension, and then you can share the link to the OneTab with students and now they have access to the website you want to share with them.

Share to Classroom
With the Share to Classroom extension, you can quickly push web pages to any of your Classroom classes, so they open instantly on your students' devices.

Tuesday, April 24, 2018

How to Set Up 2-Step Verification


How to Set Up 2-Step Verification


In this post, we are going to talk about how you can set up 2-step verification on your Google account. What is 2-step verification? 2-Step Verification is an additional layer of protection on your Google account. When you log into your account, you will receive a notification asking if you are indeed the person logging into your account. You can then say yes this is you or no this is not you. You have to take 2 steps to log into your account, hence the name 2-Step verification. Here are the easy steps to enable this extra layer of protection:

1. Head on Over to My Account

The first thing you need to do is head on over to My Account. You can access your account by heading over to myaccount.google.com. Once you are there, click on Sign-in & security.


2. Select 2-Step Verification

After selecting Sign-in & security, scroll down until you see Password & sign-method and click on 2-Step Verification.


After selecting 2-Step Verification, you will be greeted with a brief explanation of 2-Step Verification. Go ahead and click on Get Started.

3. Sign-in to Google Account

It is then going to ask you to sign-in to your Google account. Go ahead and log into your Google account.

4. Choose Your Device and Method of Notification

After signing in to your Google account, you will be asked to choose your device and your method of notification. You can receive a text message with a PIN code that you will enter or you can choose Prompts. Prompts is a notification you will receive from the Google app.


If you decide to use Prompts, you will be asked to select a backup option which is either receiving a text message or phone call.

5. Turn On 2-Step Verification

After setting up the backup option, you are now ready to turn on 2-Step Verification. Go ahead and turn on 2-Step Verification.


You are now all set up to have an extra layer of protection on your Google account. You can find more information about Google's 2-Step Verification by visiting Google's 2-Step Verification.


Change Page Size in Google Slides and Drawings


Changing Page Size in Google Slides and Drawings


Have you ever wondered if there was more you could do with Google Slides besides just using it as a presentation tool? Then this is the blog post for you. Today, we are going to talk about how you can quickly and easily change the page size in Google Slides. Why might you want to change the page size in Google Slides? Here are some ways I have used Google Slides other than a presentation tool:
  • Make posters
  • Make e-books
  • Social media posts
  • Meme generator
To change the page size, simply open up Google Slides. From there, head on over to File > Page Setup. By default, Google Slides is set to Widescreen 16:9 ratio. If you click on that, you can change the page size to Widescreen 16:10, Standard 4:3, or custom. Choosing custom allows you to set the page size to whatever dimensions you want. The same steps can be taken in Google Drawings to adjust the page size.


How will you use this in your classroom? Share in the comments section!